Scene Layout Tools
A layout and scene-composition toolkit for Unreal Engine, bringing familiar workflows from Maya, 3ds Max, Clarisse and Houdini into the editor — hierarchy management, transforms, alignment, spline distribution, view modes and viewport bookmarks.
They’re simple but effective, and built to speed up your layout process. Watch the demo below, then jump into any tab from the sidebar.
Install and Open
Install
- Add Scene Layout Tools to your engine from Fab.
- Open your project, go to Edit > Plugins, search for “Scene Layout Tools” and enable it. The Python Editor Script Plugin is required and is enabled together with it.
- Restart the editor when asked.
Requirements: Unreal Engine 5.7 or 5.8, Windows, editor only. No other plugins are needed.
Open
To open, go to Tools > SceneLayoutTools, or find the EUW inside the Plugin folder, right-click and “Run Editor Utility Widget”. The same Tools section also has Viewport Bookmarks, which opens the bookmarks tool in its own window.
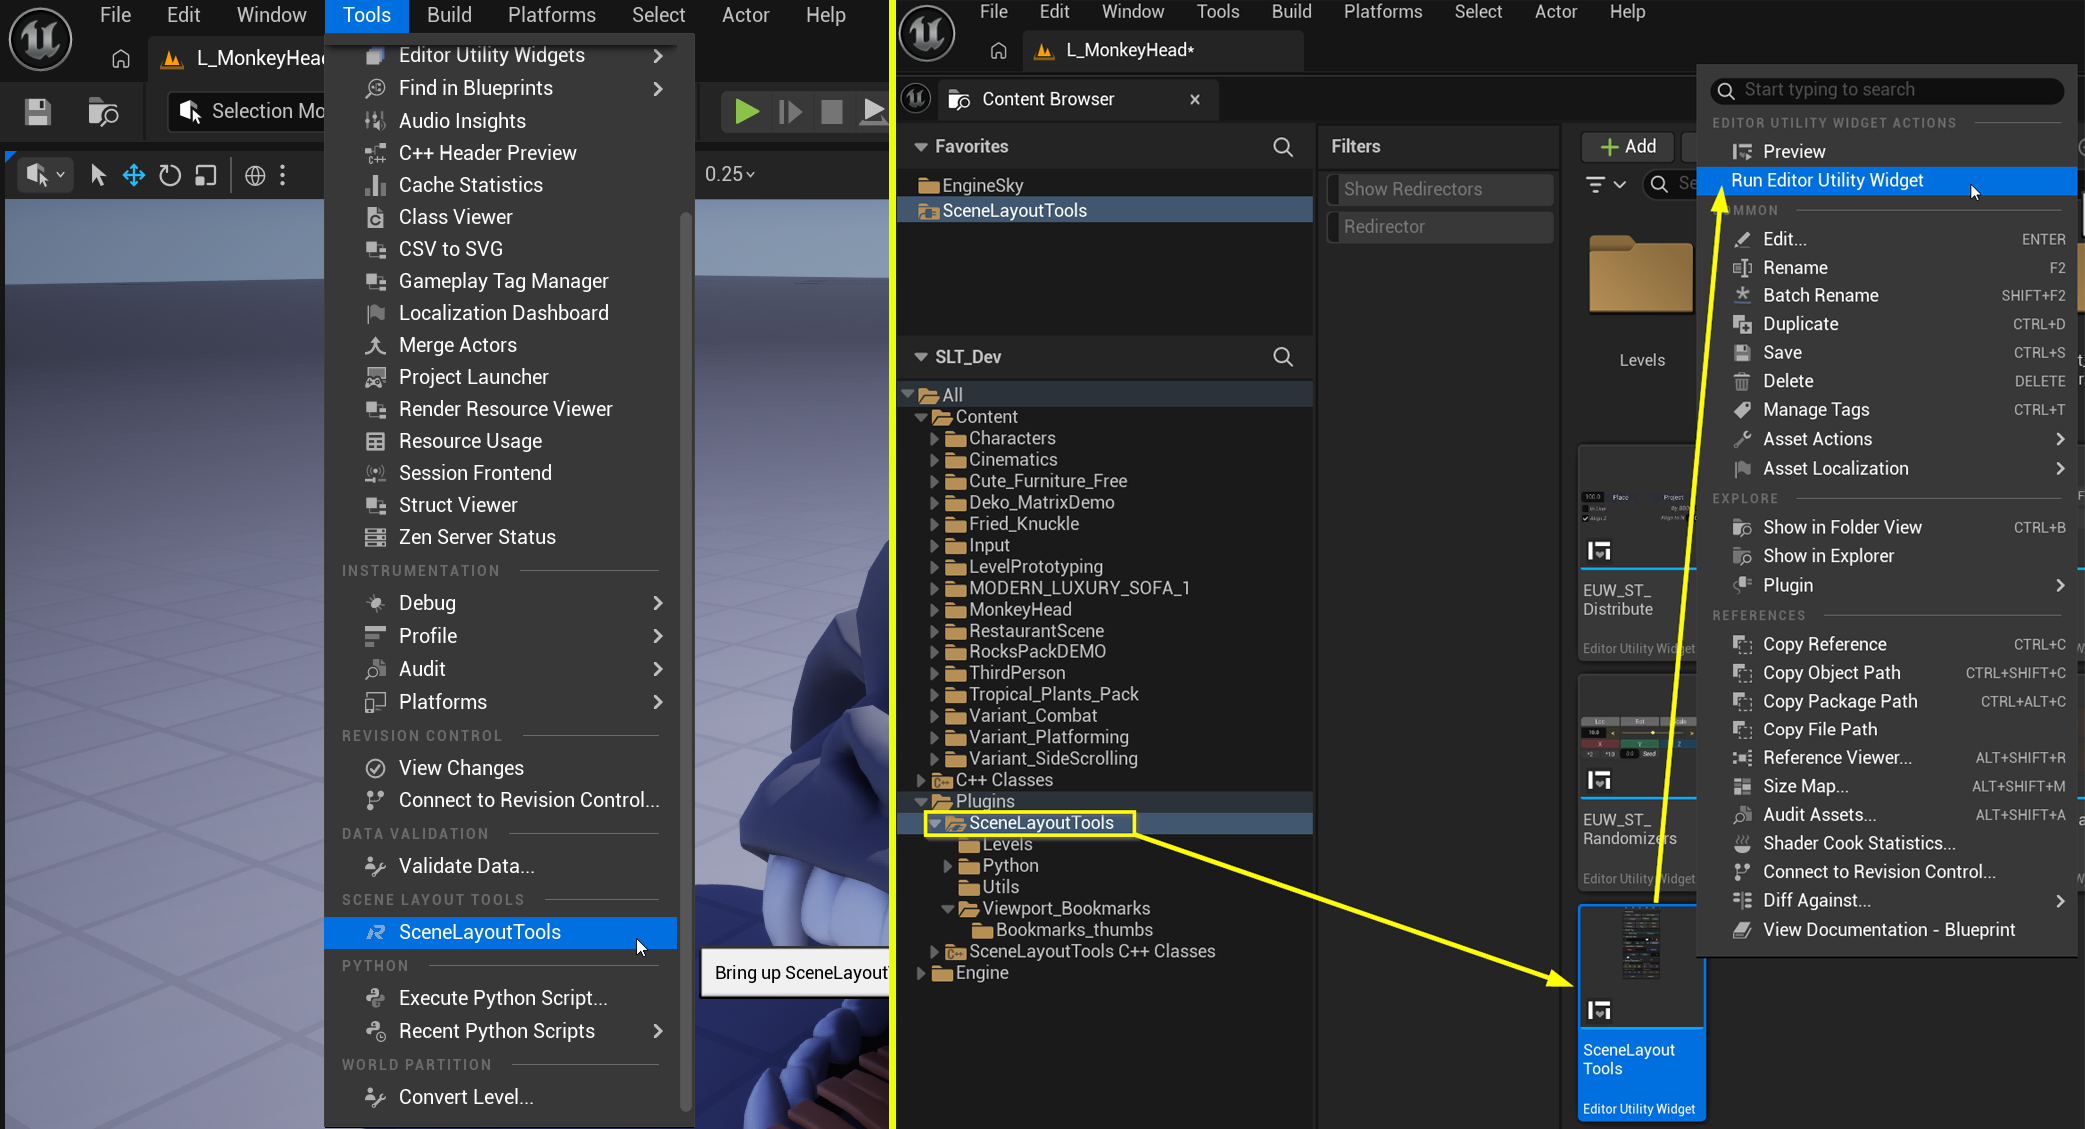
If you can’t see the Plugin folder, click on the small cog icon on the top-right corner of the Content Browser and check “Plugin Content”.
Where your data is saved
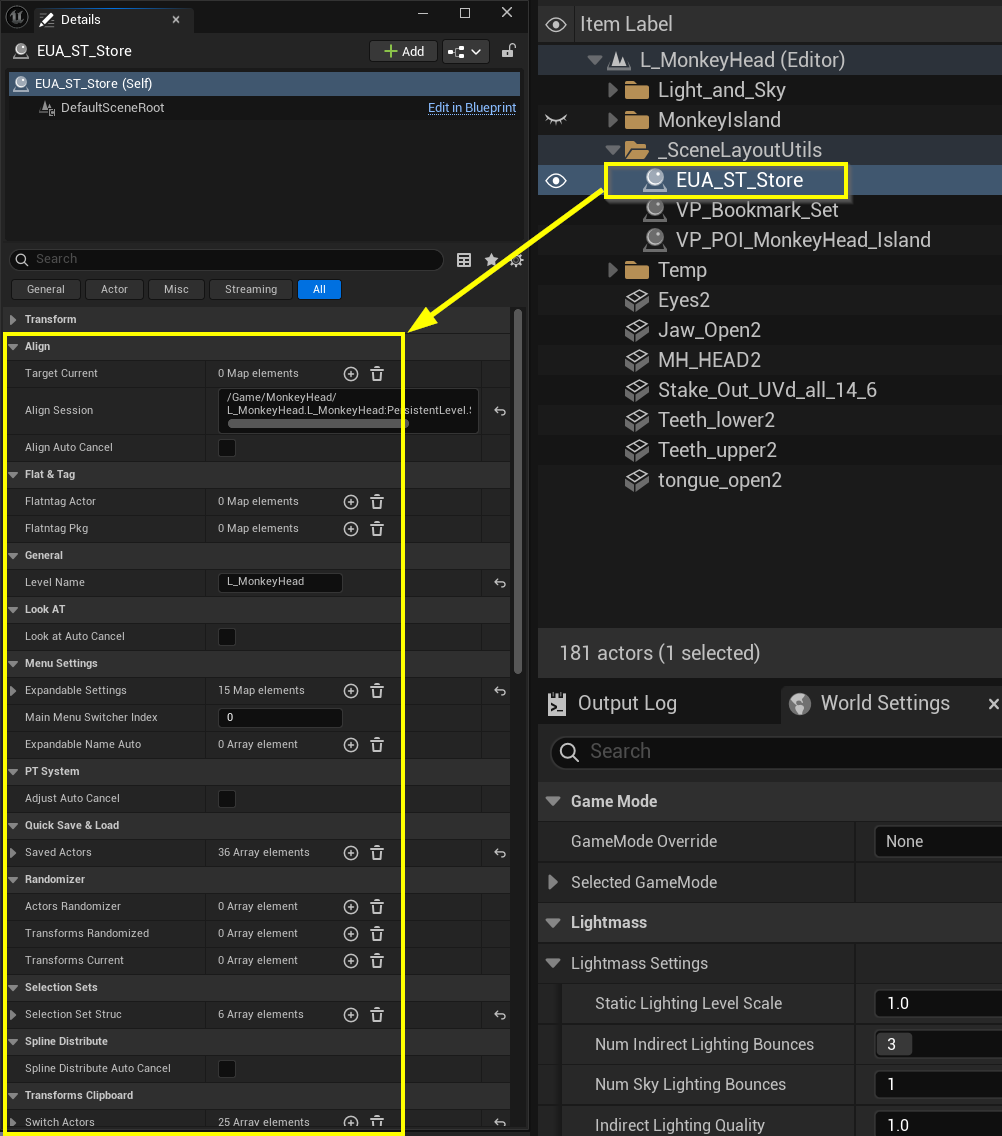
- The tools keep their data (selection sets, clipboards, layout) in a helper actor, EUA_ST_Store, created automatically in each level under the Outliner folder _SceneLayoutUtils. Viewport bookmark sets are kept in EUA_VP_Store actors. Save the level to keep your data.
- Bookmark thumbnails are saved in your project under Content/_SceneLayoutUtils/Bookmarks_thumbs.
Demo levels
With “Plugin Content” visible (see the tip above), open Plugins > SceneLayoutTools Content > Levels.
Upgrading from Selection Sets or Viewport Bookmarks
Install Scene Layout Tools in place of the smaller plugin. Your saved selection sets and bookmarks carry over.
UI & conventions
A few conventions run through every tool. Getting comfortable with these first makes the rest of the manual much faster to read.
Collapsible menus for a compact UI
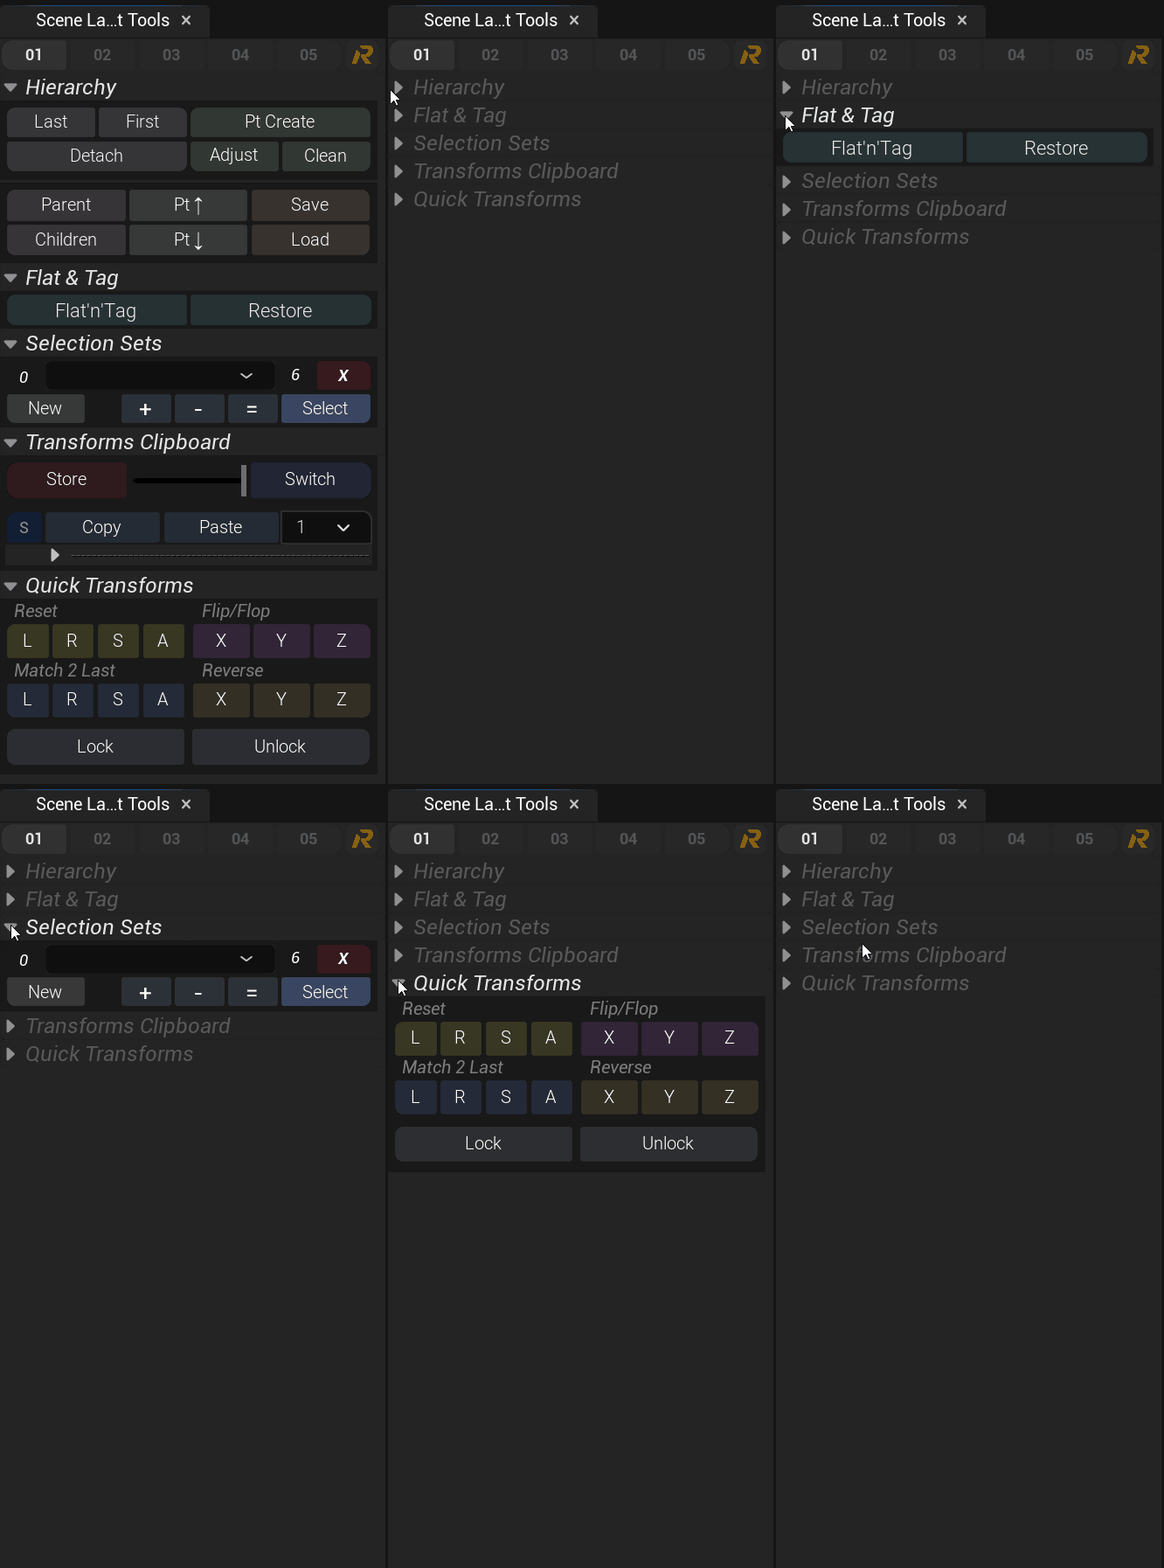
The “ButtonFn” modifier button
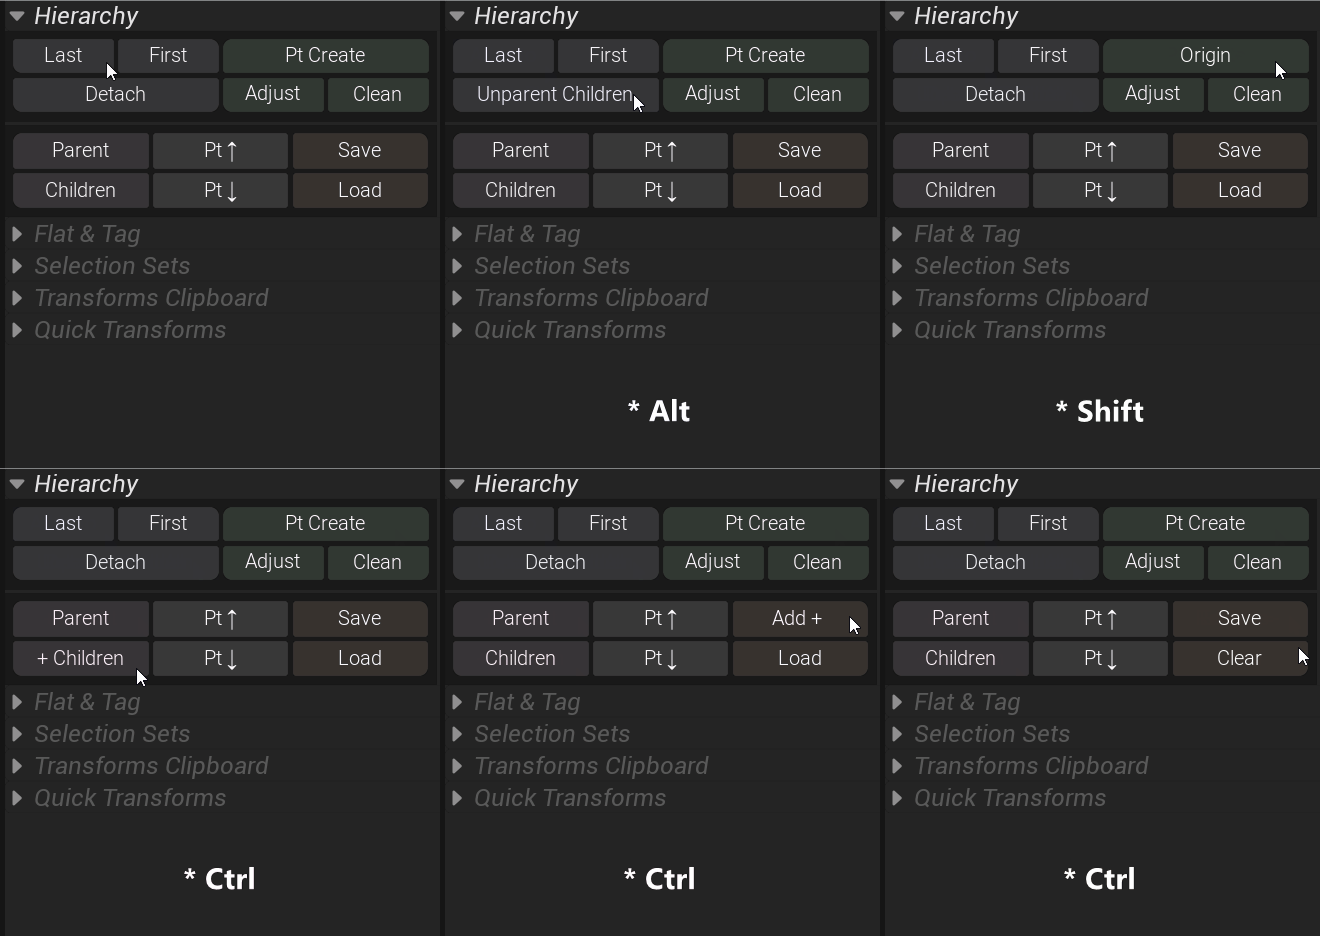
A small set of C++ components power the ButtonFn modifier button, which uses Shift / Alt / Ctrl as alternate functions. Hovering with a modifier held updates the button’s label, so you always know which function is active.
Persistent storage (EUA_ST_Store)
Toggle tools are outlined while active
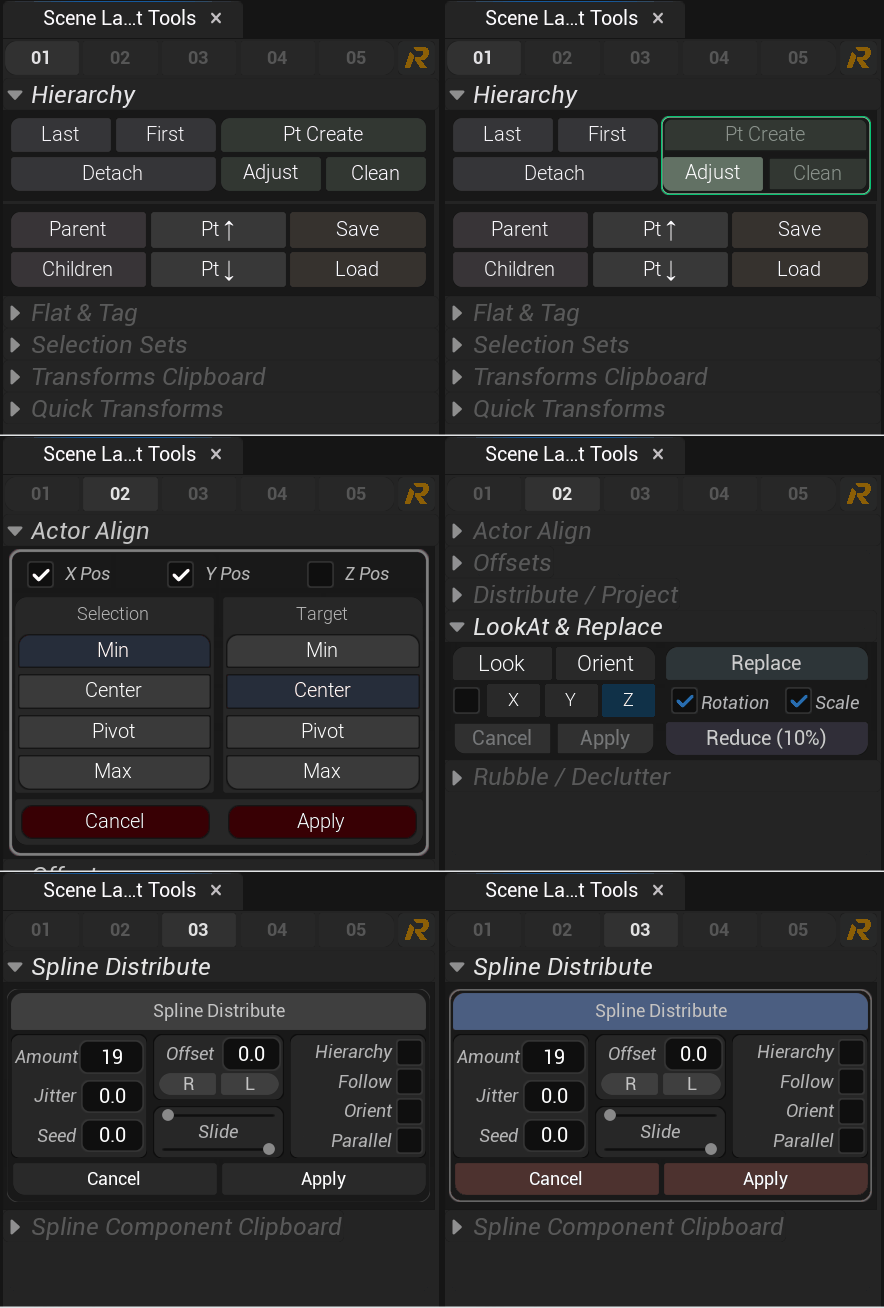
Tools like Align, LookAt, Spline Distribute and Adjust PT get outlined while active, and automatically Cancel or Apply when the selection changes. Watch each tool’s demo for details.
The Unreal 5.7 console command for viewport modes is broken, so about two-thirds of Tab 04 (Shade AOVs and Checkers & Debug) won’t work in this version. Still unresolved as of 5.8.
Feel free to rearrange, move, delete and configure the menus however you like. In return, please leave feedback, suggestions and bug reports — this is an experimental tool and your input helps it improve.
Hierarchy & Selection
Attach, group, filter and store selections — Maya- and 3ds Max-style hierarchy management for the outliner.
Hierarchy
A quick attach/detach tool. Maya-style: select a group of actors and the last (or first) actor selected becomes the target parent.
PT Create
A grouping system, like Maya. It creates an empty (PT) actor and parents the selected objects to it. The modifier controls where the PT is created:
Reposition a parent without changing the hierarchy. It’s a toggle — click to brighten and outline the menu, move the parent, then click again to restore. Similar to 3ds Max’s “Don’t affect children”.
Deletes childless PT actors — from the current selection (Click) or the whole level (Ctrl / Alt / Shift).
Parent / Children
A basic selection tool for moving up and down the hierarchy.
PT Up / Down
Like Parent / Children, but filters the selection to only PT actors (or only non-PT actors).
Save / Load
A single clipboard for a selection. Good habit: save any selection you spent time building before you go adjust something else.
Flat & Tag
Complex hierarchies are great for organizing the outliner, but risky for publishing — they can be read as single objects and break HLODs or World Partition. Flat & Tag flattens a hierarchy completely for publishing, benchmarking or troubleshooting, then restores it when you need to keep working.
Select the full hierarchy and press Flat’n’Tag — everything is flattened and tagged. Press Shift to reselect all the tagged objects.
Tags are automatically deleted from actors when you restore them.
Selection Sets
Works like 3ds Max’s Named Selections. Select the actors and click New, give the set a name, then press OK (or Ctrl Enter). Made a mistake? Ctrl-click New to rename the current set.
To recall a set, press Select, or hold Ctrl and click the desired set in the combo box. Add, Remove and Equals work as expected — select actors and click the matching button.
Store & Switch
Test alternate transforms — different light positions, say — without losing the originals. Select actors and press Store to save Transform A. Change them to Transform B, then press Switch to toggle between the two — or slide between them.
Releasing the slider midway overwrites the current transform. If you want to experiment with the slider, back the transform up first with Copy / Paste. Store & Switch also tags the actors, so you can reselect them or clear the tags later.
Copy / Paste
A glorified transform clipboard — 5 slots, local or world space, whole transforms, per-row (L/R/S) or individual axes.
Quick Transforms
Transform shortcuts for arranging block-out pieces and set dressing.
Lock / Unlock
Like RMB → Transform → Lock Actor Movement. Lock: Click selected, Ctrl/Alt unselected, Shift selects locked. Unlock: Click selected, Ctrl/Alt all, Shift smart-toggles locking on the selection.
Transform & Layout
Align, offset, randomize, distribute and project actors — the layout operations you know from 2D tools, applied in 3D.
Actor Align
If you know 3ds Max’s Align tool, you’re home. It gives a real-time preview and gets outlined while active — if the selection changes mid-align, the operation is cancelled, so hit Apply when satisfied.
- 1Select the actors you want to align.
- 2Select the target actor last.
- 3In the left Selection column, pick which part of the actors’ bounding box is the anchor.
- 4In the right Target column, pick which part of the target’s bounding box to align to.
- 5Click Apply.
Offsets
Transform multiple actors on their local axis simultaneously, with a real-time preview — by preset values or a slider.
- ›Choose the transform to offset — Location, Rotation or Scale.
- ›Set the max value per adjustment in the left spinbox.
- ›Pick a single axis (X, Y or Z — they work individually).
- ›Arrows offset by that value ±. Ctrl / Shift / Alt multiply by 2 or 10, or divide by 2.
- ›The slider runs to max / min, with the same multiplier modifiers.
- ›Use ×2 / ×10 to bump the spinbox value (Ctrl for ÷2 / ÷10).
Randomizer
Uses the same layout as Offsets, with a few differences:
- ›Randomize more than one axis at a time.
- ›Location / Rotation can use World or the standard Local space.
- ›Scale offers uniform-scale randomization.
- ›A seed spinbox controls the noise.
- ›Sliding goes positive (right) or negative (left); hold Ctrl to go both ways at once.
Distribute
Spread actors in a grid or line pattern.
In Line spreads in a line instead of a grid. Align Z aligns all actors on Z.
Project
Projects actors onto the next surface — like pressing End, but you choose whether the contact point is the pivot or the bounding box.
By BBox (checkbox off = project by pivot). Align to N: 0.0 keeps rotation, 1.0 fully aligns to the surface normal.
LookAt
A “last selected = target” tool. Like Align, changing the selection cancels the operation and rotates the actors back.
- ›Select the actors to look at.
- ›Select the target actor last, then click Look.
- ›Choose the axis to align and whether to invert it, then Apply.
Orient doesn’t change the actors’ height axis — it just orients them vertically toward the target.
Replacer / Random Selection Reducer
Replaces the selected actors with the last one selected. Unlike swapping for a browser asset, here all names and parameters are copied from the last selected actor.
Randomly reduces the current selected actors based on a percentage — 10%, 25%, 50% or 75%.
Set Physics
A quick shortcut to turn on physics for the selected actors. Watch the video for a full workflow.
Declutter
Spreads overlapping actors just enough to clear their bounding boxes. It works in all directions — unless pressed with Ctrl + Alt + Shift, which keeps height and declutters horizontally only. Great alongside the other tools for dressing organic environments, rubble and debris.
Splines
Distribute actors along a spline and copy spline components between actors — a lightweight, non-technical alternative to PCG.
Spline Distribute
Born from a level designer who wanted to scatter objects along a road without learning PCG — and to easily re-do it as the road’s shape evolved.
- ›Select the actors to distribute.
- ›Select the guide spline last, then click Spline Distribute.
- ›Adjust the parameters below, then click Apply (changing the selection cancels).
Spline Component Clipboard
Copy / paste, but for an actor’s spline component — useful for syncing splines across actors or blueprints (e.g. a Camera Rig Rail following a train track).
- ›Select an actor with a spline component and click Copy (Ctrl = world space).
- ›Select another spline actor and click Paste (Ctrl = world space).
You can also project the spline points to the surface below, above, or along the viewport Z axis — just like the Project tool in Tab 02.
View Modes
One-click toggles for viewport settings, shading AOVs and debug modes.
View Controls
The same controls found in the view settings, but a single click each:
Shade AOVs OFFLINE
A one-click switch between useful View Mode settings:
Most of these console commands were disabled in recent Unreal Engine builds, so these tools are offline for now. Hopefully they’ll be re-enabled in a future update.
Checkers & Debug OFFLINE
Debug view modes for checking shading, HDR, SSS and more:
Offline in this version — same console-command limitation as Shade AOVs.
Viewport Bookmarks
A robust bookmark system for large levels — with labels, thumbnails, notes, custom ordering, multi-user sets, CSV export and one-click cameras.
Overview
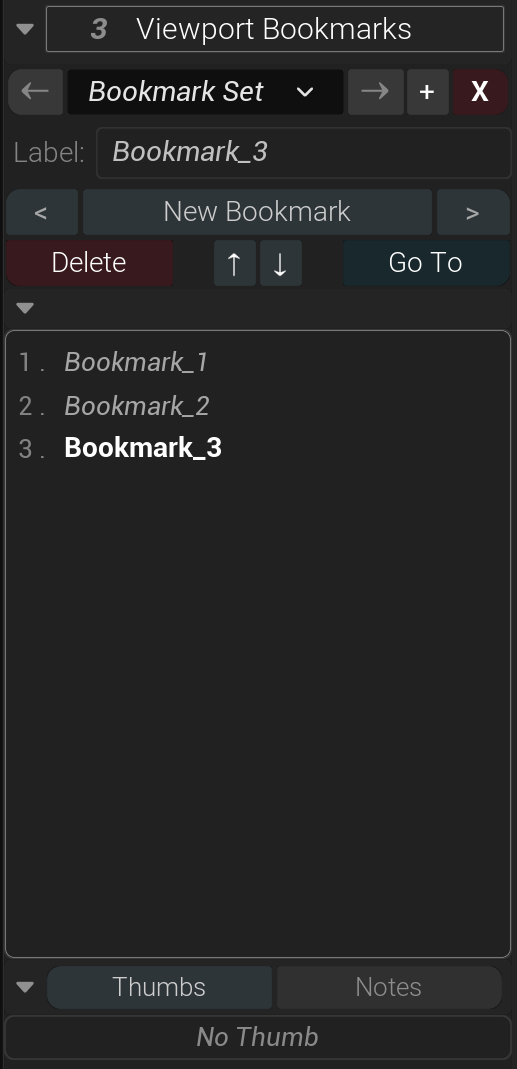
Need to navigate a large level quickly, save richer info than Ctrl+1/2/3, and share bookmarks across a team? This tool holds labels, thumbnails and per-bookmark notes, supports multiple sets for multi-user workflows, exports to CSV, and can create cameras at the viewport position.
Section A — Single user
Each set stores its data in an Editor Utility Actor named VP_SetName inside the _SceneLayoutUtils folder.
- ›Press +, name the set, then OK (or Ctrl+Enter). A
VP_actor is created and the tool activates. - ›Select the VP actor with Ctrl+“+” (label switches to “S”); rename it with Alt.
- ›Delete a set with the red X (Ctrl to skip the warning). Avoid deleting the actor from the Outliner directly.
- ›Frame the viewport, click New Bookmark, and rename it in the Label field.
- ›Ctrl+Thumbs saves a thumbnail into
Viewport_Bookmarks/Bookmarks_thumbs. - ›Add per-bookmark notes in the Notes tab, then repeat for each view.
Shift+Thumbs saves thumbnails for the whole list. Ctrl+Go To creates a camera from the selected bookmark (label “+Camera”), parented to the VP actor. Shift+New Bookmark exports the list — notes and bugit commands — to a CSV.
Section B — Multiple users
When a co-worker or producer wants their own bookmarks in the same level, press + to create another set with a different name. Switch between sets with the upper arrows or the combo box. To select the VP actor directly, hold Ctrl while switching.
Section C — Relative position / angle
Bookmarks are saved relative to the set actor (VP_SetName). By default it sits at the origin, so bugit values are relative to zero — but if you move or rotate the set actor, the bugit command compensates automatically.
That means you can parent the set actor to a key actor, save bookmarks relative to it, and later reposition or rotate it while the bookmarks stay consistent. The same works with Level Instances — save bookmarks in Level A, import it into Level B, reposition and rotate, and the bookmarks still match.
You can’t edit bookmarks while the level is nested inside Level B — open Level A to change them.
About the author

I’m Fernando Reule, a 3D / technical artist with 20+ years of experience: 7 in advertising (Seagulls Fly, Koi Factory), 10 in VFX (ILM, DNEG, WetaFX), and 4 in games (Epic Games, EA).
Back in 2021, moving to Unreal Engine after many years in VFX was a challenging, exciting adventure — but I missed the layout tools I relied on in Maya, 3ds Max, Clarisse and Houdini for organizing composition, hierarchy and the outliner. So little by little I built them for Unreal.
Thanks for your interest in Scene Layout Tools. They’re simple, but they’ve sped up my layout process a lot — I hope they do the same for you.
Contact & Feedback
Thanks for your interest in Scene Layout Tools. Feel free to reach out with any questions, feedback, bugs or complaints. I build this in my spare time around a regular job, so support time is limited — but I’ll do my best to get back to every comment. Thank you for your patience.